API Token & Zone Configuration
How to create a secure Cloudflare API token with Zaraz Edit permissions and connect WP Zbridge.
API Token & Zone Configuration
Section titled “API Token & Zone Configuration”WP Zbridge Pro uses Cloudflare’s REST API v4 (/client/v4/zones/{zone_id}/settings/zaraz/config) to read, update and publish your Zaraz configuration. Lite doesn’t need a token; it exports the container instead.
Creating Your Cloudflare API Token
Section titled “Creating Your Cloudflare API Token”-
Access API Tokens in Cloudflare
Section titled “Access API Tokens in Cloudflare”- Log into the Cloudflare Dashboard.
- Click your user profile in the top right corner and choose My Profile > API Tokens.
- Click Create Token.
-
Use Custom Token Template
Section titled “Use Custom Token Template”- Scroll down to Custom Token and click Get started.
- Enter a descriptive Token Name:
WP Zbridge Deployment Token.
-
Configure Permissions
Section titled “Configure Permissions”- Set the following two permissions:
- Zone | Zaraz | Edit
- Zone | Zone | Read
- (Optional) Add Zone | Analytics | Read to show Zaraz activity, rejected requests and your zone’s traffic statistics on the dashboard.
- Set the following two permissions:
-
Limit Zone Scope
Section titled “Limit Zone Scope”- Under Zone Resources, choose:
- Include | Specific zone | YourDomain.com
- (Optional) Set an expiration date or client IP address restrictions.
- Under Zone Resources, choose:
-
Generate & Copy Token
Section titled “Generate & Copy Token”- Click Continue to summary, then Create Token.
- Copy the generated token string. (Cloudflare will never display this token again).
Locating Your Cloudflare Zone ID
Section titled “Locating Your Cloudflare Zone ID”- In your Cloudflare dashboard, select your domain name.
- In the right-hand sidebar of the Overview page, scroll down to the API section.
- Click to copy your Zone ID (a 32-character hexadecimal string, e.g.
d3b07384d113edec49eaa6238ad5ff00).
Entering Credentials in WP Zbridge
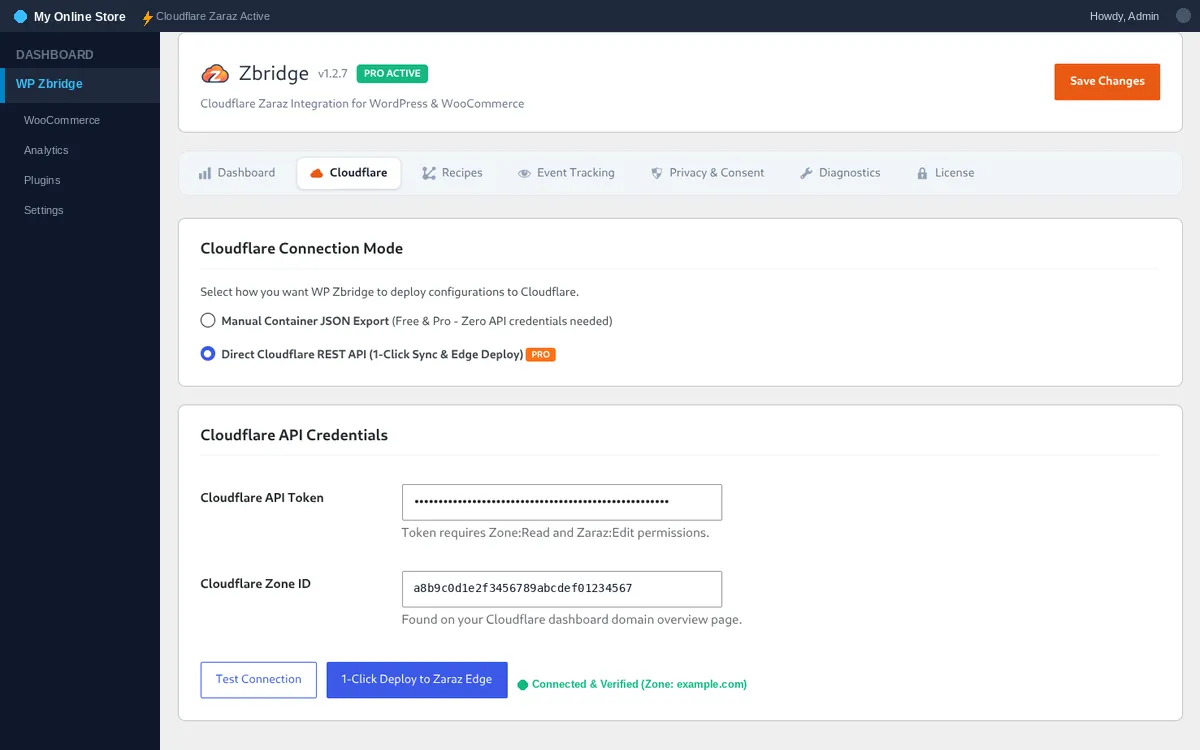
Section titled “Entering Credentials in WP Zbridge”- In your WordPress admin, go to WP Zbridge > Cloudflare & Edge.
- Paste your API Token and Zone ID.
- Click Test Connection. A message confirms whether WP Zbridge can reach your zone.